Friday, June 3, 2016

Last of the flooring: Floors No More

Hallway
What's with the title you wonder: I have completed removing all the carpet from the home and replaced with laminate flooring, Yippie.  I know I am the only one celebrating.

There is already a post about how to do laminate flooring, but I thought I would add to that post with some recent photos and some added tricks to help you along the way.

First, if you don't have this app you should: Handyman Calculator.  It is available on Google App Store and is totally free. Sure you can buy the premium version, however the free version gives you so much stuff.  Whether you are doing floors or laying brick you need this tool: it calculates everything including total project price, square yards, square feet and cubic feet, and air volume. Yes, air volume for those who need HVAC calculations.   It does a lot, lot, more and you will not regret the download at all.
Second, put down the measuring tape.  That's right, you don't need a measuring tape to lay laminate, tile, nor hardwood floor.  But what you do need is a Sharpie to mark the boards.  Only use the measuring tape for hard areas that are hard to get around such as closets.  Instead of using the measure twice cut once rule, line up your next cut by laying the board next to the area to be cut and mark it.  You will have to flip the board the opposite direction, but by marking instead of measuring you will get the most accurate cuts and save you some material and frustration.


Additionally, do not throw away all the cardboard boxes from the flooring.  One or two of these will come in handy as templates for entry ways, door jambs and closet opening. By creating a template you will save yourself time, material and money.   To use the box as a template, unseal the edges (top, bottom) of the box and unfold them.  Lay the box under the door jamb and trace it onto the box using your Sharpie, then transfer that to the flooring.   Please Note: the stud  of the door frame is usually about 2 inches away from the sides doorjamb and about 3 inches in the front.  To check the space under you doorjambs use a straight ruler, not a tape measure, and mark it on the ruler.  This will help ensure you have the right depth of cut so that there will be less chance of filling gaps.


Get a Good Underlayment: do not go with the cheap roll of underlayment they will be more trouble then they are worth.  I went with an underlayment that was a little more pricey, but less the hassle. I went back to my store (Lowes) and found this easy cut underlayment that comes in 100 Sq. Ft sheets.  (39.99 pk).   The first floor (see earlier posts) I used the roll type underlayment and I quickly grew frustrated with having to weigh it down so I could cut the next piece to size and tape it down.  This goes on flat and you can cut it with scissors or a knife. Definitely worth the money.  In my pictures you will see 3M Aluminum HVAC Tape securing the underlayment.  Well the reason for this is because aluminum tape is recommended for this type underlayment I purchased.  However, when looking at the price of the tape ($10.00 for a small roll), I looked at the HVAC tape at 8.00 for a large roll, this tape will always come in handy.  You never know when you may find yourself doing some HVAC repair. 

Next ONLY REMOVE the base boards you need to remove:
I have seen and heard of people removing all the baseboards in the room before laying the floor, however, I found it easier and beneficial to only remove those that need to be removed.  These usually tend to be the front of the room and the wall the last row falls.  Why do I say this, the first row of flooring is always going to give you issues and when you are laying it down by yourself  the baseboard will give you that extra hand that you need in keeping the floor from shifting and even.  But how do you know which baseboards to remove?  Once you have decided on which direction the floor will flow (usually determined by light source) the two (3) baseboards will be easy to determine.  In addition, when laying laminate or hardwood flooring you want to ensure you leave at least 1/4" gap from the wall and the floor for expansion.  Leaving some of the baseboards down will ensure you have this safety buffer. You can tap the edges of the flooring under the lip of the baseboards to hold the flooring down, but DO NOT tap them to the base of the wall.

Speaking of Gaps: you will have some gaps around the doorjambs and closets, these are unavoidable but can be easily fixed by using caulk  or adjusting the door casing.  The latter is time consuming and can be tricky so I suggest taking a piece of the flooring with you to your local Flooring store or hardware store and see if you can match the caulk to the floor.  It may not be 100% matching off the shelf but will be close. You can also mix colors to try to get it to an exact match if you like (Art classes pay off ).

Transitions, smansitions why not go transitionless?  Transition-less floors are a thing of beauty and are not hard to accomplish.  There are only (will only be ) two transitions on this floor: bathroom entry and from tile to laminate transition.   Many say don't go transitions-less as buckling can occur but buckling in the floor is only caused by the expansion and contraction of the house or a water leak. This is why they tell
you to keep 1/4" of space from the wall and the floor.  Transition-less flooring allows the  lines of the floor to continue from one room to the next without being interrupted.  It does take some planning and I scratched my head for a moment before I solved my own problem.  See I laid the floor in the main bedroom first and ended it at the doorway before I ripped up the carpet of the hallway.  The floor is measured out so the locking side is placed toward the hallway. As you can see in the pictures there are no transitions from the closets to the hall nor the bedrooms to the hall.  The first room took some time to complete but this is where that template will come in handy.

Closets:  people complain of the doorjambs well my arch enemy was the closets. I have three closets in just the hallway alone not to mention the ones in the bedroom. Each closet was the same but yet each was challenging.  The very first one was at the right of the hallway and I had to start on the right side of the hallway as I had already finished the master bedroom floor and was doing transition-less flooring.  This one closet took me at least 2 hours to do,  UGH!!  The closet was no bigger than 3 or 4 sq. feet, but I managed to get it done and continue into the hallway. There is one good thing about lock and snap flooring, they pretty much go together in any direction as was the case with this first closet.  The closet floor actually is laid horizontally as opposed to the vertical lines in the hallway.  Again, I am no Pro if I did it over I probably would have figured out the best way to lay the boards in this closet. But I redeemed myself with the other closets in the hallway.

My last two tips for you guys is to invest in a multi-tool and glue.  Doorjamb cutters are way expensive and the handsaw trick will make your life miserable.  The multi-tools come with vibrating/rotating saw blades and make quick work of cutting the baseboards. They do cause a lot of dust so make sure you have a vacuum around which will help with the cleanup.


Why Glue? when you are doing hardwood or laminate you will eventually end up having to butt two pieces together for longer runs of flooring or for those pieces that require only 1-2 inch strips of flooring. Using glue is a process the pros use and is simple to master in order to join two pieces together (big or small).  Remove the locking trim from the edges of the boards to be joined.  If this is a fresh cut and no locking edges you can still use this method.  Using your glue, preferably wood glue, but white (school) glue works well if you don't have any wood glue around; run a bead of glue on both boards and then tap the planks in place until they are joined. Use a damp cloth to remove the excess glue.  You can see this technique on YouTube.


Only thing left to do is re-caulk the baseboards that you removed and install the 1/4 round trim around the base of the floor.  I hope these tricks will prove useful to you. there are some videos on YouTube that may explain the transition-less floor better and help you measure without a tape measure.

Friday, January 29, 2016

Ugh its a Broken Valve!!! Laundry Room Remodel

Well it happened yup the dreaded washing machine died so out it goes, but before I disconnect the machine I shut off the water to the house.  I know its not a necessary step because there are valves that can be closed, however, I didn't trust the valves as they were old.  I turned off the cold water valve pretty easily with a little force, but the hot water would not budge an inch.  I twisted it to open, still would not budge, then twisted it to close still nothing.  I added more pressure on the valve and it gave, I thought thank you Lord, and so I turned it some more and the stem broke off in my hand. It was stuck to the open position and thus couldn't turn the water back on. What a way to end a Saturday afternoon. 


There are many things I am but a plumber is not one of them.  After trying unsuccessfully to try to get a plumber to come out (earliest was Friday of the week), I decided to try it myself.  I used  enlarged the hole around the valve to try and unthread it from the pipe, unfortunately they were braised on, yes the threaded pipe was braised on.  I tried melting the solder using a propane torch. I held it on the valve for 5 minutes and using pliers (pipe wrench) tried to unseat it, but it would not budge. Only thing left to do is to cut the pipe.  


Had to make a 2' x 3' hole in the wall to access the pipes enough to remove the old valves (faucets).  What moron decided it was good to build the wall using two pieces of sheet rock?  After I sawed through both sheets of sheet rock I used my $3.95 pipe cutter to cut the pipes and used steel wool to clean the copper.  I removed the burs caused by the cut and even file the cut to make sure there are no sharp edges. 


Now the trouble starts:  I used Mueller ProLine Push Fittings (female coupler)  that I purchased from Lowes.  I purchased 4 (@ 8.57ea) just in case one or two were bad.  I also purchased a Washing Machine Box (34.95).   The push fittings are supposed to be quick and simple to use and require no glue or sweating the pipes together (this is why I purchased them as I am not good a sweating pipes).  I place the first one on the cold water line and screw in the new valve (test fitting) I then do the same to the hot water line and go outside and turn the water to check for leaks.  Well it didn't take long before I noticed that there was definitely a leak but not from the threaded valve but the push fitting that was said not to leak: FAIL!  It was not just a leak but a steady stream of water pouring from the bottom of the fitting.  So I try again seeing as how the cold water line is holding (has a small drip) compared to the hot water line.  I remove the fitting and try the next three.  I polish the pipe with the steel wool and made sure there was indeed no sharp edges that may break the seal.  All three push fittings FAILED.  

I called a guy I knew and he came over ( a simple job turns into hours) he attempted the same thing (he knew what he was doing as compared to myself)  however, the fittings all leaked. He said "well looks like we gonna have to solder them on I guess."   Solder kit 15.99 at Lowes and 12.00 at Home Depot.  I took the push fittings back to Lowes got my 32.00 back and went to Home Depot.  On the isle I saw the SharkBite push fittings.   I remembered reading online about SharkBite fitting and people using them so I decided to buy both the fittings and the solder kit.  But the guy had to leave so my brother was on his way to sweat the pipes.  He's much better at welding and soldering than I so it should be rather simple for him. 

But I wanted to try these fittings just one more time. So I got home and pushed the fittings on each line and re-tapped the threads of the valves with plumbers tape to do a test fit.  I turn the water on and Viola!!! no leaks.  So apparently the Push Fittings at Lowes (Mueller ProLine) are cheap, worthless imitations:  I guess I shouldn't say cheap at $8.57 each.  The SharkBite fittings were $5.67 each. 

Since the test fit worked and at this time its 7:45 in the evening and I am tired I undo the valves and place the washing machine box in the hole to make it semi presentable and screw everything back in place and turn the water on and check for leaks. Praise God no leaks.  So I secure the box to the wall for now until I can decide if I want to re-sheet rock the area or do a patch job.


All this because of a broken Valve.  Time+$$+Energy x Frustration = experience I guess.  But onto the next phase Tiling. 

The laundry room had linoleum tile in it and it was crumbling (another poor install job) and since we are getting new machines and have to take the old ones out I might as well get started. 


First, if you have a store called Dirt Cheap in your area check them out. They have great prices on tile and other things: you can even buy a pair of jeans for $2.00.  Yup $2.00 you just have to look through the racks of clothes - hopefully they have your size.

But they pretty much carry everything, tools, clothes, shelving, tile and flooring.  After spending 67.00 in supplies that includes a 50lbs bag of white mortar and 5 boxes of 20 x20 tile  we are all set to tile.

I still have not grouted that patio yet as the weather has been freezing lately so why not just start this and grout the other during weekend when it's supposed to be in the 70s.  I did not take a before picture of the laundry room, but trust me it was a mess.  But the tile turned out nicely.  It was a bare making the cuts for the legs of  the water heater stand, but I got that done.  The tiling of the laundry room only took two evenings a total of 8 hours.  Grouting will commence as soon as I can get the moment after work.


</


Thursday, January 21, 2016

Talk of the block: Patio Makeover:

When we moved into our house some 11 years ago we didn't think much about the backyard.  Yes we hosted bar-b-q's throughout the year and had numerous dinner parties. However, while we hosted these events we didn't pay much attention to the patio, until a few years ago.  See the previous owners  decided to paint the patio, first it was green and then a light gray.  The paint in areas started to crack and separate so every time one would step it would sound like a bowl of Rice Krispies.

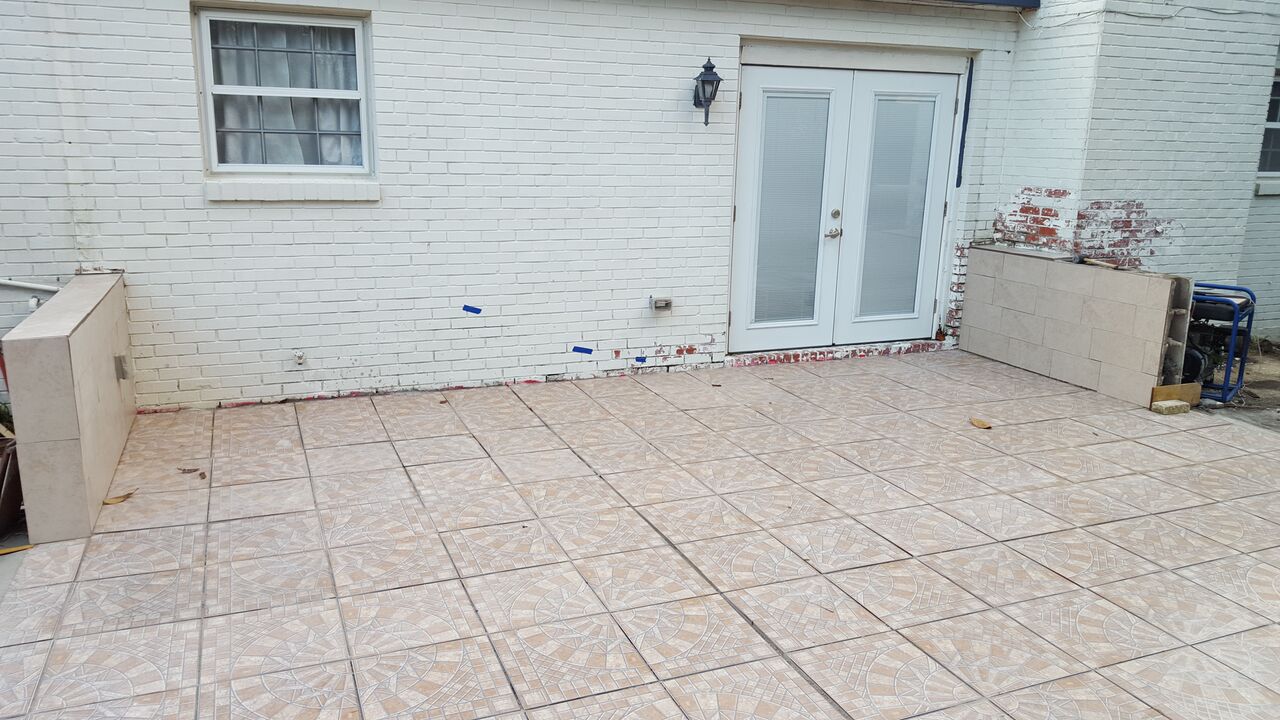
So we decided that it must be dealt with, but that was not the main concern.  As stated in previous topics we live in Florida the Sunshine state that received an average 59.21" of rain per year, and with this rain, we noticed after each rain there stood about 3" of water in right corner of the patio.  Whomever, laid the slab of the patio did a poor job and thus the right slab of the patio developed a 25 degree slope that ended up being 1.5" below the foundation and causing the patio not to be level.  The picture above is the patio in question it is a total of 367sqft  as you can see by looking at the brick line the left of the patio is slightly below the right slab so this had to be fixed.  Standing water can cause a lot of damage even to concrete.  


Two years prior I had the wild idea of what to do with this space, why not tile it.  Sounded like a good idea, but how to accomplish this feat?  Research!  yes I asked a few friends and asked a builder and did some searching online and viola I figured out what exactly I needed.  

Material List:

Tile (16x16)
Cement
Type S Mortar
Rubber mallet
RedGard Waterproofing and Isolation Membrane
Paint rollers (2)
Backer Rods
Grout
Caulk
Float
Bull-float
Level
3/8' spacers
cement
Trowel
Sponge
Bucket
Wet tile saw
Angle grinder
Knee Pads


First Choosing Tile:
First things, first  the area to be tiled is 367SqFt. and finding the correct tile is a chore.  Since this is an outdoor uncovered patio the tile needs to be slip resistant.  The tile should also be made for outdoors,  however, you can use ceramic and porcelain tile outdoors. It is not recommended that you use these type tiles as they can crack in very cold conditions. With that being said we found a pattern of tile that we really liked the only problem was that it did not say it could be used outdoors.  The tile we choose had a slip resistant surface and a striking pattern. Since we found the tile we wanted it was just the matter of purchasing it: $375.00 on sale.


Because we had chosen a tile that was ceramic and not designated for outdoors we had to make sure that the tile would hold up under weight, stress, and external conditions.  


Prepping the Patio:
Remember I said the patio was painted by the previous owners?  It had two layers of paint plus a primer.  The paint and primer has to be removed as the top coat of paint was flaking off.  I did not want to use any harsh chemical solvents  which is costly, time consuming and dangerous to animals and children so I opted to use a pressure washer with a turbo nozzle.   Equipping the turbo nozzle to my 1900psi pressure washer made quick work of stripping off the layers of paint.  Some came off in large sections while others took many times to remove. In all it took me a day to do the entire patio. 

Leveling:
Once the patio dried out (1 day) it was time to address the leveling of the patio and mend any surface cracks.  Using a level and a string I determined that the right side of the patio was in fact level so I needed to raise the left side up to become level.  Using a the level, tape measure and chalk line, I marked the brick to where I needed to level the patio.   If you need to level a floor they do sell a self-leveling mixture that you can use to save time. 

However, I did not buy the mixture as I needed to ensure that water drained off the patio correctly.  Instead I used three 80lb bags of cement  and added more water than what  was prescribed.  The mixture needed to be more fluid to ensure that it covered the area needed. 

Starting with the lowest side I poured the concrete mixture and spread it out using a trowel  ensuring that I was the height required.   After establishing the desired (leveling) height, I made a 45 degree slope away from the house to make sure that water drained away from the house.   I brought the cement all the way to the end of the patio using a bull-float.  As the slope became thinner I mixed in  Type S mortar to feather out the end of the patio.
 
Tip: if you don't have a bull-float you can rent one from Home Depot for 4 hours at about $13.50 total.

There was no need to slope the right side of the patio just yet, I can do this later  when creating the mortar bed for the tile.

Expansion Joints:

Expansion joints are essential in slabs that are more than 16'. The joints allow the concrete to expand and contract, absorb vibration and allow movement due to ground settlement. These joints minimize any cracking that may occur during ground movement. You must take note where these expansion joints exists as you do not want to cover them in cement or mortar doing so will cause your tile to crack when /if  the ground moves. 

Note: You must take these joints into consideration when laying out the design for your patio.  Use caulk to fill in these joints DO NOT USE MORTAR OR CEMENT.


Crack Membrane:
RedGard  Waterproofing & Isolation Membrane
It's important that when laying tile over a concrete slab that you fill in any cracks, divots or holes in the concrete. Mending these existing cracks now will ensure your that your tile will last longer and that the cracks will not carry through to your tile.  If you notice any large cracks in your slab you will need asses whether these cracks have grown or remained about the same.  Cracks have  a tendency to expand and contract during the seasons, if the cracks continue to expand I suggest you look into having them fixed professionally before proceeding to tile.  You can fixe these cracks yourself, but there could be an underlying problem that is causing the cracks to expand.

To prevent cracks from carrying through to the tile, you will need to lay down a crack resistant membrane.  There are several on the market that you can choose from, I used RedGard because it was cost effective ($139.00 for 3 gallons) and after research was the best choice.  Ditra Isolation Membrane is also very good, but is expensive ($84.98 a roll) and covers only 54SqFt. per roll. 

RedGard is a liquid rubberized plastic material that can be applied either using a paint sprayer, a paint brush or paint roller.  It's drying time is about an hour and an half, but should only be applied when temperatures are about 40 degrees for 72 hours.   When it dries it will change from bright pink to a dark red as seen in the photo above.  Apply the RedGard to a thickness of .38mm for optimum protection. RedGard is great for tiling in wet areas such as bathrooms, kitchens and even to cover basement walls.

Once  the membrane is dry you should begin placing the mortar and tile down immediately.  If you cannot do so, cover the area in plastic or protective material to keep from damaging the membrane.  Do not wear the spiked cleats used when doing concrete as they will puncture the membrane.

Laying Tile:
Before you begin to lay the tile make sure you do a dry pattern first. This will allow you to choose how you want to lay the pattern of your tile. It will also allow you to make any adjustments and pre-cuts that are needed before you commit the tile to the patio.

It is important to use the right mortar. Since this is an outdoor patio you will need to use Type S mortar formulated to be used in outdoor environments. Mix the mortar according to the ratio on the bag and apply to the patio and back of tile.  

Depending on the area you are tiling this will not be completed within a day so do not rush. If you are unable to finish the area remove any excess mortar using a damp sponge and clean water.  In case of inclement weather cover with plastic to protect the mortar bed.   Again, this will take more than one day to accomplish depending on the area of tile to be covered.

Once the tile is down please remain off the tile until it sets (3 days).


Because of the are of the patio I wanted to cover left a slight lip from the old slab to the new tile I laid additional mortar at the edges to prevent tripping.  In these pictures you will notice the two half walls.  I did not want to leave these walls as they existed so I decided to tile them.  This presented a slight challenge as whomever constructed the walls left them free-standing anchored with tie bolts.  These needed to be removed (cut) prior to tiling.  Also on the far wall (left) is an outlet which power is ran under a wooden plank secured to the wall by these tie bolts. 
Using and angle grinder and cutoff wheel I cut the tie bolts flus with the block. I also carved out a notch in the top of the block to house the Molex wire that provides power to the outlet.  Make sure you turn off the power before attempting.

Tiling Walls:
You will also notice in the above picture the same person that built the wall incorrectly built the right wall and cut off the facing blocks leaving it hollow only covered up by a board also anchored with the tie bolts and a few nails.   These boards had to be removed in order to tile the walls. Again using the cutoff wheel on the angle grinder I removed these bolts (two at the top on in the facing block).  

half walls tiled and facing covered and repaired
 Since the wall on the left  has an open face I had to build a footing to support the first face tile.  I did this by using a scrap piece of wood that was square and poured mortar  into the open bottom face.  Once is hardened I wet the edges of the block wall and the prepared the mortar, however, this time I used a little more water than needed to make it a little stickier than when laying the tiles.  I applied tile to the outer edges of the cut blocks and also to the back of the tile.  I placed the tile and tapped it in securely with the rubber mallet. I then attached the second face tile repeating the same as the first. I then rigged a support for the facing tile using scrap wood.   I left an open tile on the top of the wall and proceeded to mix another bucket of mortar and poured the mortar into the opening thus filling up the hollow cavity.  The wall is now repaired and ready to be grouted along with the patio.  I had left over mortar so I took the liberty of finishing feathering out the edge of the patio with the mortar that was left over again this prevents a trip hazard.   I chose this picture as you can see the shed from the last project in the corner, but also it was a good angle showing the entire patio before it is grouted.


Grouting:
Grouting is the easiest part of tiling, though the hardest part is trying to match the color grout with the tile, but after you found the color it is pretty simple.   To save a step I suggest you purchase an additive that will both seal and protect the grout.  The additive is used in place of water, however, if you need to you can add more cold potable water into the mix without affecting the protection.  When grouting outside please make sure you follow the manufacturer's directions.  Do not grout when temperatures will be below 40 degrees or if you are expecting lots of rainfall in the area.  Tile should not be walked on for at least 3 days and it should not freeze for at least 10 days.


Enjoy your new patio!!!!


Now onto the next phase....


Monday, November 16, 2015

DIY Garden Shed Project

I don't know about you, but over time I accumulate stuff and that stuff was cluttering my utility room. It was stuff not junk. So much s that my wife started complaining about this stuff.   See my house doesn't have a garage and didn't come with a storage shed, so when we needed to buy shovels and tools we just placed them in the utility room where our freezer and washer and dryer resided.  However this was not optimal so I said why not just get a shed. 

I looked and searched and priced, and was going to spend over  $500.00 either way for a shed, so in my creative voice I said I will just build one.   I looked on the net for shed ideas and found one that I liked on Pintrest.  So I studied the picture over a few days and jotted down some notes.   But never really drew up any plans.  Yes you read that correctly. This shed was built without a single plan only an image.  The total cost of the shed was

But this shed was going to be slightly different after all I live in windy Florida place of hurricanes and sporadic storm fronts.  What does living in Florida have to do with building a shed?  Well there are some things you have to consider.  With winds reaching up to 60mph during a spring or summer storm you don't want to see your shed tumbling through the neighborhood.  So it has to be sturdy and secured. 

Most sheds you see on Pinterest are your basic garden shed, not really secured, but just relying on the weight to keep it in place.  Not so with this.  

THIS IS NOT A WEEKEND PROJECT  expect to spend some time on this project to get it right.

Tools & Hardware - Let's start with the tools you may need to build your shed
Circular Saw Corner Brackets
Miter Saw or table saw Wedge Anchors (tapCon Screws)
Drill 4" Deck Screws
Level(s) 3" Deck screws
Hammer 1 1/2" Deck Screw
Tape Measure1" Deck Screws
Speed SquareRafter ties  
Palm SanderStud Braces
ClampsGate Hinges
Socket WrenchLock/Latch
Rubber MalletShingles/felt/plywood

As I stated anchoring your shed should be first thought when building your shed. Some places require you to pull permits or submit plans when building a structure on your property so you may want to check with your city before deciding on a location for your shed.  But Permits are for suckers, who needs a piece of paper after all it your property right?!  

I am not going to put how many of each item you will need to complete the project because it totally depends on the size of your shed. 

I chose to use treated pine for my shed as it was easier to find and cheaper material than cedar ( 1.20 vs 3.94).  As long as you get pressure treated lumber your shed will last a long time.  The total number of screws used in my shed are 353.

I used the following wood sizes depending on your project:
1x4x10 ,  2x4x12 , 1x6x16 

Pouring the Foundation

I chose to place my shed off the utility room (just  in case I ever wanted to run power to it). Once I had the location now I needed to both raise it to prevent water from entering and to secure the shed.  Using left over wood from a pergola I tore down, I framed out my new foundation.  Pouring a foundation is relatively simple, all you will need is about 5 - 15 60-80LBS bags of cement depending on the thickness  and square foot of the foundation.  You will also need a wire mesh (not rebar) that can be found at Lowes or Home Deport for under $10.00.  Cement can be pricey so watch for sales at your local hardware store.
$8.95 at Lowes.
Once you have framed your foundation lay the wire mesh in the frame covering as much of the area as possible. The wire mesh will give your foundation some added strength and flexibility to prevent it from cracking as the ground shifts.  Follow the directions on your cement for the appropriate water to mix ratio.  Using another board (skrim) and person smooth out the top of the foundation ensuring the cement settles into the corners well. 

Before the foundation hardens insert  the wedge anchors.  This will prevent you from having to down drill into the foundation to insert Tapcon Screws.  Threaded end pointing skyward. The wedge anchors will be used to secure the walls to the foundation.  The anchors should be spaced about 18" - 20" apart to ensure that there are away from any studs when framing the walls.

Cover the foundation in a plastic sheeting this will help the curing process and also protect your newly poured foundation incase of any inclement weather.  The foundation may seem difficult but if you have ever mixed cement you can do the foundation.  Please wear gloves when working with cement as it can eat your hands raw.  The foundation took me 2 hours to mix and set using a wheel barrow and shovel. Depending on the weather it may take up to 3 days for your foundation to fully cure.

Framing Walls

While the foundation is curing, you have time to frame out the walls of your shed.  There are three main walls: the two sides and the back.  If you need to sketch them out before starting now is your chance.  Unlike most, I prefer to use screws when working with wood. The main reason is for durability. Screws do not work themselves out unlike nails will over time as the wood expands and contracts.  Secondly if you mis-measure or have to undo your connections you can easily unscrew them instead of risking damaging the wood with a hammer or mallet.

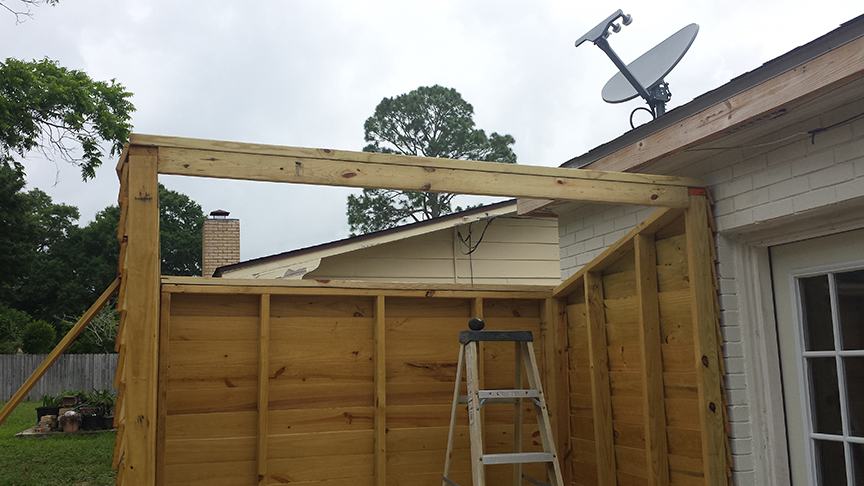
In this picture you can see the side walls are actually framed.  The shed will having a sloping room. The roof is sloped toward the back to help with drainage from rain.  It is important to take the slope / pitch of your roof into account.  Depending on where you decided to locate the shed rain water runoff can harm the area around the shed.  It is also important when framing the walls as you want to ensure that the walls sit flush.   The studs on the walls are 16" on center.  You can do walls 24" on center if you wish, but 16" is the norm meaning that every 16 inches you should run into a stud.  

The back wall (not shown) will be shorter in height than the other two walls.  Please make sure that the walls are even and flush at the corners.

Siding

Lap Siding stained and secured using screws
Choosing your siding for the shed in itself is a chore. You can choose lap siding (as I did) or you can go with solid plywood walls and stucco, or brick.  The least expensive is the lap siding or paneling.  After the walls are framed this is the next step into building your shed.  I chose pine dog ear fence boards in 10' lengths. Cut off the dog ears and stain or waterproof the fence boards.  Staining will take some time but will give you various options in colors to choose from. Staining and weatherproofing the wood will guarantee long lasting use.   Which ever siding you choose please make sure you take the time to prep the area by sanding if necessary and/or staining and painting.  It will be easier to do so now than when the shed is completed.

Lap Siding is easy to achieve.  Measure the length of the wall and transcribe that to the planks. The bottom plank should cover the base of the frame fully. Using your table saw/miter/circular saw cut the boards down to size. If your wall is square, you can make continuous cuts until you get to the taper at the top.   Make sure the first plank is level across the frame and using the 1 1/2" deck screws screw the board down.  Take the next plank and overlap the board just enough to cover the screws in the previous board.  Use your level and make sure that it is straight and secure this board to the frame as well. Make sure the plank is secured to each stud on the wall. Hint: Predrill all the holes in the planks  before screwing to prevent splintering or cracking.

Repeat these steps for the two side walls and the back supporting wall. 

Putting it together

At this point in the project you will need a partner. After the siding is placed onto the exterior walls they will weigh significantly more.  Ask a friend or neighbor, a son, wife daughter but don't try to do it yourself.  Unfortunately, I been working out some and the weight wasn't the problem it was supporting the walls while you ratchet them into place. But I managed to do it alone.. How did I accomplish this?, prayer helped, but also two 1x4x10 posts (which is what you will need later)  1 placed on the outside of the wall the other placed on the inside to hold the wall in place.   The wedge anchors come with hex nuts and washers for fast easy installations.  If you remember from previously your anchors should be placed 18" - 20" apart. transpose the locations of the wedge anchors and drill a hole through the base of the walls (bottom plate)  3/8" hole in this case. You may want to make the hole larger than the bolt so the wall will fit easily into place.  Once all the holes are drilled (make sure you double check the placement.   Hint: take white out or paint and place a dob of it on top of the anchor lift the wall and set it down on top of the anchors (these will place a mark on the bottom plate) and drill the hole.

Set the walls in place, have your friend hold the wall while you ratchet the wall into position.  Check to make sure everything lines up smoothly and secure the walls.  The wedge anchors will support the walls as each one is rated for over 250lbs of force.   Join the walls together in the corner. you can use a 3" deck screw to joint the side wall to the back wall.  Here again you may want to predrill the hole.  Wood is natural and since it is natural there are some knots that you can't see.  Predrilling these will save you time and heartache trying to force the screw through this hard section of wood.   I placed 6  of these 3" screws on each wall.  Once all three walls are together place an L brace on the bottom of each of the studs.  This will give it an added layer of reinforcement to prevent sway another step is to brace each section of the wall with a cross brace, more on this later.
You will notice a mistake I made in prepping the wall.  OH SNAP!  I forgot a wedge anchor.  Oh well not to worry. Get a hammer drill and an TapCon Screw and drill through the baseplate and foundation, insert the TapCon and viola fixed.   Remember place the "L" braces along the studs of the wall 1 per side.

Top-plates and Rafters

By now your shed should have all 3 walls in place
and is free standing (well with the help of a brace). The next step you can skip if you are just building a simple garden shed. But I don't know what simple is so here is the next step adding top plates.  What is a top plate? It is an upper wall plate which is fastened along the top of the wall studs as pictured here.  By the time you finish building this shed you will be ranked as an intermediate framer, meaning that the techniques used to frame this shed is the same as framing out rooms and walls in houses and buildings.

The top plate is going to be used to secure the rafters for the roof as well as secure the three walls together.  But first we need to put another board across the front of the shed.  This board will be used to frame your doors as well as support the roof and rafter system.  This beam will provide lateral support for your shed as well and contain a top plate.  Measure the distance from wall to wall and cut the beam (2x6x10) and knock it into place using the rubber mallet. Again its time to call a friend or call in a favor.  You will need more than one person for this section of the project.  If you have a drill to make pocket holes here is when you need to do so.  

If you do not have a pocket hole joiner (Kreg Tool) simply predrill the holes in at a 45 or 35 degree angle into the adjoining boards.  Then screw the beams together with the appropriate length screw.  Do this for both sides of the beam.  Next measure the length for the top plate.  The top plate should extend from one side wall to the other and across the door frame.  Secure this top plate with screws or nails your choice but screws are better.
Top plate over door and back wall.


Because my shed is angled and not square I had to do some additional cuts to place the top plates across the sides of the two walls.  What do I mean by additional cuts? Well as  you can imagine since the walls are slope
d the space at the end of the walls are slightly off,  though the height is not the issue since we will be adding rafters  to the shed for the roof.  Not necessary if you are going to do a flat roof ( just frame it out as you would a wall).   But remember I said I am not simple so I don't take the easy way nor many short cuts.
So how did I overcome the issue with the height of the side walls vs the height of the back wall?  Simply I ripped the 2x4x6 the same angle of the wall  using a circular saw and notching out a section to secure the top plate.  This would be easier using a table saw but I did not have one handy at the time of this build.  Mental note buy a table saw.
  
The top plates can clearly be seen in these photos. The gap at the top plate is easily solved by adding shims or cutting scrap wood and hammering it into the position of the gap, once in screw down the top plates, you can also caulk this area if you want. 

Adding top plates to the shed will add strength and stability  to the structure as well as give the rafters an area to be secured down.

Determine the length of your rafters (they should all be the same length).  Here is where you will need to use a speed square to determine the pitch of the roof and to make the notches in the rater over the top plates on both ends of the rater.  I suggest using scrap wood before making the initial cuts on your wood so you can get the angle just right.  The two outer rafters I had to rip in half as they would have been higher than the rest of the roof.  When you find the right angles for the notches use each board as pattern for the remaining rafters.  You may need to make some slight adjustments for each rafter as wood is not perfectly straight.  With the use of your friend ( you may have to bribe them with some beer or food) lift the rafters into position.  Like I said I did this portion alone as well, after all I was still working out regularly, lol. 

Back of rafter with 3 rafter ties
Use the 4" deck screws to secure the back ends of the rafter.  Predrill as much as you can as these longer screws can bend easily if you hit a knot.  The screw should go through the rafter and the top plate.  Remember rafters are usually made up of 2x4x10s  (the actual height of a 2x4 is between 2.75" and 3.5"  its not really 4" so long screws are needed. The head of the screw should penetrate the wood as well (do not leave them flush)  which will indeed reach the top plate.  The rafters are secured by 2 of these long screws. Repeat the process for
Front of rafter secured with 2 ties
each rafter front and back. Make sure you check the spacing before securing the front of each rafter;  you want to at least maintain 16" between each rafter.  Add the bracing (rafter ties) to each rafter, 1 on each side of the rafter front and back. Also, for additional support add rafter ties to using the inner bracing as seen in the picture.  There should be 5 rafter ties per inner rafter and three for the exterior rafters.

Repeat the process for each rafter securing both the back and the front of the rafters to the shed.  these rafter ties are normally used with nails however, I always use screws even though they are  more expensive it just means you don't have to worry about the boards coming undone.  The rafter ties are secured with 1 to 1 5/8" screws. You will need to make sure that there is a screw in every hole. If you pulled a permit the inspector will be looking that each hole is used.

The holes are there for a reason so make sure you use them.  Rafter ties will securely hold the roof system in place and will also hold up in winds in excess of 100mph.  Here is a

closer look at the rafter ties used.  You can pick them up from Lowes for as low as $.59 each, yes fifty-nine cents. Do Not  over look these.

Now that the rafters are basically installed, we need to add cross bracing to the roof system. Cross bracing adds stability and durability as well as allowing the roof decking a place to be anchored too. Measure the space between each rafter and using the scrap wood that  you is left from the 2x4x8s  cut them to fit in between each rafter.  Make sure you stagger them in a step pattern.  Secure the cross bracing with 2" deck screws or nails.   Once you have finished bracing the rafters do the same thing to the interior walls of the shed. the cross bracing here will prevent the twisting and swaying of the walls and add strength.  These cross bracing in the walls can double as storage space or shelves for your tools.

Now it's time to add the roof decking.  Roof decking is nothing more than sheets of 5/8" or  3/4" plywood. Hoist the roof decking in place and secure using either screws or nails; you already know which I chose, yup 1 1/2" screws.  Place hurricane clips between the decking sheets. the hurricane clips provide strength to the decking where there is a two pieces being joined.   Tack down the roof felt (about 24.00 a roll at your local hardware store), you will have a lot of felt left over, using roofing tacks.

Building the Doors

The doors of the shed can be done last as well as the added trim. To build the doors you will need to frame them using 1x4x10s and fence planks or plywood.  The fence planks look more decorative.  Once you have measured the inside frame for the doors transfer those measurements to your lumber.  Frame the door as you would the walls, first the outer walls beams first, followed by the cross bracing then secure the planks to the door frame. Remember to leave room from the edges of the door for the hinges and the closing of the door.  You will need to add a door stop to the door frame and you want to make sure that the edge of the door fits properly.  You will need to use your large clamps here as well as a bottle of wood glue and the same friend you called upon before.  These are large doors and are considerably heavy between 50 - 80lbs each.  Depending on the size of your door you may need three gate hinges to attach the door.  Have your friend hoist the door in place while you attach the gate hinges start at the top, proceed to the bottom hinge and then the center hinge this will make sure the door is even.  Open the door  and close it to make sure it is landing where you desire especially at the door stop.  Repeat this process for the second door if there is one.  I chose not to stain the doors as the natural wood grain on these planks look great.

You are almost done,  just a few more touches and your shed will be ready to store your items.  Choose your shingles, mostly likely use the same type as is on the roof of your home. I chose

architectural shingles, cost a little more but I only needed two bundles (29.00 each).  I left the overlap of the shingles at the front.  The reason for this is that I wanted the shed to be able to breath.  Sure the lap siding provides some airflow but the I purposely left the portion between the roof and the top plate open so air could pass through freely alleviating the danger of fumes from gas or any other chemicals that may be stored in the shed.  I did, however, put a screen (not shown) in these gaps to keeps wasps and insects out of the shed.  I also took an added measure of preventing spiders and other unwanted insects by spraying pesticide around the top and bottom of the shed. This is to be repeated every 6 - 9 months.

Enjoy your new shed.

Monday, January 5, 2015

Wood / Laminate Flooring

Tired of that carpet?  Is your carpet worn out? Well replace it with a floating wood or laminate floor. I have already done the main living room and den with laminate flooring. For as much money and support and free exposure I am giving Lowes I should get some kind of kickback.

Well let's get started. This is not a hard job at all and depending on the area that you are covering it could take only a day.  I got my Cherry wood laminate floor from Lowes at a cost of 19.21 a box.  If you sign up for MyLowes program it will keep track of everything you purchase in case you need to buy more or replacement parts. It also allows Lowes to send you coupon savings that you can use for other purchases. Sometimes $15.00 off a purchase of $50.00 and $25.00 off a purchase of $200.00 or more: the saving prices vary. But they do send these out to members especially those who continually purchase material or items from them. 

OK enough free publicity.

Let's Get Started:
The very first thing you should do is to decide on the color flooring you will want to go in your home (yes men listen to your wife, girlfriend, whomever).  DIY is not just for men but women also can do this job with little trouble. 

First, as always measure the area in which you are working. Remember to find the square footage of a room just multiply length x width (LxW = SqFt).  

You will need the following tools to complete this project:
  • Tape measure
  • Miter Saw
  • Utility Knife
  • Square
  • Wood floor kit (will contain spacers)
  • 1/4" round molding
  • underlayment
  • Rubber Mallet
  • Pry bar
  • Knee Pads
After you have all the tools you need, you will have to empty the room(s) of all the furniture.  You can just move some furniture aside however this becomes more of a hassle than just taking it out.  Stop being lazy and save yourself some time and frustration by having an empty room.  

Using your utility knife, find the seam in the carpet and cut the seam of the carpet. Grab a corner of the carpet and pull. Carpet is held down by a tack strip that is located at the perimeter of the room. If you cant grab it with your hand grab some pliers and pinch a good amount of the carpet and pull up.  Carpet is easy to remove. Once you have the carpet up, remove the carpet pad, don't be too disgusted about all the stains you will see, some of them are from the foundation or subfloor. Other stains,  well if you have animals that would explain the more prominent stains.

Use the pry bar to remove the tack strips. Tack strip are held down by small nails. If you have a concrete floor you will probably notice some of the cement comes up with the tack strip at the nails. Do not worry it is normal, besides we are going to cover the concrete with an underlayment.   After, you have removed all the carpet, carpet padding and tack strips sweep the floor of any debris.

Underlayment:
There are various types of underlayment you can purchase: standard plastic roll, fiber based and thermal insulated.  Your underlayment must have a moisture barrier.  I suggest you purchase an underlayment that has moisture barrier as well as sound deadening abilities. I do not recommend just using the thin plastic foam underlayment: it will not provide a lot of sound deadening nor comfort as you walk.  Be prepared to spend at least 60.00 per 100 sq. ft. on a good underlayment.  A good one of choice to use would be Tecsun 100-sq ft Premium 0.125-in Flooring Underlayment which can be found at Lowes.  It thickness is an good sound absorption and it is both mold, water and moister resistant.

Underlayment come with a tape strip. This tape strip should face the interior of the room and be able to seal the seams between the underlayment layers. Please ensure you have extra tape as some of the underlayment's tape adhesive may not secure correctly. It does not hurt to re-tape the seams of the underlayments.

Direction of Floor:
I know you are saying what?!! there is a certain direction the floor should be placed?  Well yes of course direction is everything. The grain pattern in the floor can either make a room look small or larger.  Just like they say stripes make you look thinner or bigger depending if they are horizontal or vertical the same thing can be said for flooring.   Determine where your light source is and run the pattern of the wood towards that source (for example if you have front widows the boards should face that direction).

Placing Floor:
You should have the underlayment down and taped securely. The most important row to get right is the first row.   Using the spacers provided in your wood floor installation kit, lay the first row approximately 1/4" from the wall. This will allow the floor to expand and contract during changes in temperature and prevent buckling of the floor. Note: there should be a 1/4" gap around the entire perimeter of the floor.  

DO NOT PRECUT ANY OF THE FLOORING

After you have the first row down, using your miter saw (skill saw or what have you) cut about 1- 2 inches off the first board on the second row.  You need to make this cut so that the floor will be staggered. The horizontal joints at the top of the board should not line up, but be placed in a staggered setting (think of a staircase). Tilt the board slightly on the lip of the first board making sure the bottoms are even.  Continue to connect the flooring  and repeat the steps ensuring to cut 1-2 inches off every other row. 

If you have any corners to go around wait until you get to the corner before making the cut, always measure twice okay maybe 4 times and before you make the cut. You may even want to use the cardboard box the flooring came in and trace the corner on it so that you can use it as a pattern for the cut.

1/4" Round:
Once the floor is down, use the 1/4" round to cover the 1/4" gap around the perimeter of the floor. When placing the 1/4" round in corners make sure you a scrap piece to get the miter joints correctly, unless you are a pro at eyeing the cuts.  Secure the 1/4" molding to the baseboard with finishing nails: DO NOT NAIL INTO THE FLOOR.  If you nail the molding to the floor it will eventually cause the floor to buckle during the changes in temperature. 

Transitions:
When you are doing a hardwood, laminate or tile floor you will need to have a transition in place. The transitions should be purchased at the same time as the flooring.  Transitions do not come in bundles but in a long piece. The transition will have an aluminum or tin railing along with the raised piece of flooring.  The transition is secured in place by screws that are drilled into the subfloor or concrete. You can cut the transition using tin snips or if you are like me and couldn't find your pair a good pair of kitchen shears will work nicely.  Just make sure your wife isn't home when she see's you whit her kitchen shears or you will get an ear full. But hey they are made to cut just about anything right?

Once you have the rail in place the transition snaps into place rather easily. Transitions are used at openings like doorways and transitioning from wood to tile or wood to carpet.

If you did not want to use the metal rail in the transition you can still use the wooden transition, but you will need to secure it to both the laminate floor as well as the other flooring material. If this is the case (I don't know why you really would do this ) you can use Locktight or similar adhesive. 

Finishing up:
Sweep the floor. Now is a good time to get a Swiffer or an iRobot Roomba. Laminate floors look beautiful and will last you a long time if you take care of them. Depending on the traffic in your house you may end up sweeping them every three days. If you have pets you may want to sweep every day.  

Cleaning your new floors:  You can mop them the same as you would a tile floor however be careful not to place excessive amounts of liquid on the floor as the water can seep in between the joints and cause the floor to ripple.  You can buy laminate floor cleaner from any store, the best application is applied using a Swiffer type wet/dry broom.  NEVER use products like Pledge on your floor. The wax in these products will make your floor very slippery and can cause people to slip and fall.  Though its rather entertaining to watch your pets try to walk across the area that you waxed its not very safe for humans.

Lastly, use furniture pads on the bottoms of your furniture to make sure they do not scratch the floor when rearranging rooms.  Though laminate flooring can be replaced easily, you really don't want to have to replace boards unless there is a serious need.

Sit back enjoy your new floor and marvel in your work. 


Friday, January 2, 2015

Replacing Existing Fascia Board

Everyone will deal with this issue at some point in time during home ownership. Mine came sooner than expected.

What is fascia boards?  Fascia board  in layman's terms is the wood trim around the exterior of your home which traditionally supports your gutter system.  There are many blogs out there about how to replace sections of fascia board (http://www.thisoldhouse.com/toh/how-to/step/0,,20183702_20076509,00.html)  but what if you have to replace all of it. What these blogs fail to state are the steps to take when replacing the fascia.  

Here I am taking you on the steps I did to replace the fascia board on my home.  My home was built in 1964 and we replaced the roof in 2008 (yes the roof was DIY project as well)  at the time of replacing the roof the fascia board was perfectly fine.   But 6 years later sun and water cause the boards to rot.  As you can see mine were severely rotted man I am just lucky animals didn't get in there then it would be a whole different adventure. 

Detecting Rot: 
There is one sure way to find out if you need to replace your fascia: are your gutters loose or sagging?  If you have gutters on your home and you notice that the gutter fastener has come loose from the fascia it is a sure sign that rot has begun to set in on your fascia.  If you do not have gutters closely look at your fascia board, using the handle of a screwdriver tap on the fascia board, if you notice a difference in sound and or hardness you will need to replace that board.  

Replacing the Fascia on a existing roof can be done without calling a roofing company or a contractor. If you are good with using a miter saw, tape measure, nail gun, hammer or drill then you can do this project yourself.  I suggest you get two friends to help you on the bigger jobs. 

Tools:
  • Kobalt 8in Stainless Steel  Drywall Taping knife
  • Drip Edge (if necessary)
  • Miter Saw
  • pry bar
  • Tape Measure
  • Ladder (2 or a scaffolding)
  • 2 x 6 x 12 treated lumber (Lowes or local lumber supply)
  • Roofing Tar (10oz  All Weather Roofing Cement)
  • 1lb-Galvanized Roofing Nails
  • 1-lb #10 x 3.5-in Countersinking-Head Polymer-Coated Phillips Deck Screws
  • Rubber Mallet
  • Hammer
  • Hammer Drill with phillips srew bit
  • Rotary tool (saw to cut nails if needed)
  • Caulk
  • building permit (if required)
  • Plastic sheeting (in case of weather)
My estimated cost of this project total was $220.00. Yes that is for all the fascia board on the house.
Total time well time is relative after all things come up and so does weather at times. 
Skill Level:  6 (if you can use a saw and know how to read a measuring tape you are suited to do this job)

Getting Started:
First measure the total number of square feet you will need to purchase lumber.  Remember to find the sq.ft. you need to measure the length x width.  Lumber will be your greatest expense. I recommend buying an extra board after you calculate the amount of lumber needed, this will save you time in case you measured wrong or your mitering skills are not great.  

Once you have all the materials needed to get started (a good friend included) start by lifting up the the first row of shingles. I know you are saying What!?!?!  But you must lift up the first row of shingles in order to pull off the bad fascia board.  

Removing The Fascia Board:  can be the longest part of the repair process. If you run  into issues like I did with having the roof decking tied into the nailer board.  If yours is similar you will need to break out the Dremel tool to cut the decking nails from the nailer board, if not then your removal will be easier.

Using the Taping knife, place it at the crease of the drip edge and the shingle. What is Drip edge.  Drip edge is the shiny metal that flashes the joint between the edge of the roof and the top of the fascia board.   Tap the taping knife until it goes between the drip edge and the shingle, be careful not to tear the shingles we are not trying to replace your roof just the fascia boards.  Repeat this step for the section of the boards that you are replacing.  You can do one entire side of the house if you desire to save time.  Lift up on the tapping knife and the tar should break loose under the shingles. 

Take your pry bar and find the roofing nails in the drip edge and remove them. Roofing nails are only about an inch long so you do not need a lot of room. There are usually 4 - 6 roofing nails per drip edge.  Use the pry bar to assist you in removing the nails from the drip edge.  Once the drip edge is removed use the pry bar to pull the fascia board loose from the rafters. Tip start at the edge of the miter joint in the fascia board and pull toward you. the fascia board is typically held in with 3 inch galvanized nails. 


Please note: I did not re-install the nailer board on my house  instead i used a 2 x 6 x 12 board that is used to replace both fascia and nailer board.  Nailer board smailer board who needs it anyway? in 90% of houses they all have nailer boards to offset the placement of gutters.  Me  I am not replacing the nailer board, why?  My reasoning was simple: I am just going to rest the gutters directly under the drip edge, if I choose to use gutters again.  Once you have the nailer board and fascia board off you should be able to see inside your attic area.  YOU DO NOT NEED TO REMOVE THE SOFFITS UNLESS THEY ARE DAMAGED. 

Save the drip edge:  if you are careful in removing the nails holding the drip edge you can reuse them to save you some money. Drip edge can be found at any hardware store and  each rail costs under $10.00.  Since the drip edge is thin, be careful not to bend twist or damage can occur. If you do damage them do not worry, you can tap out some bends and dents using a rubber mallet. Drip edge can be painted so if you mark it up don't worry, just cover it with paint.

Installing New Fascia:
Be safe, work smart and efficiently.  Make sure you place your miter saw on a level surface and use saw horses to help support your lumber. Familiarize yourself with the miter saw before plugging it in and before cutting.  There is something to that old rule measure twice cut once.  You've seen that show on DIY Network? That should explain it all. You don't want to end up with too short of a board when you are up on the ladder. 

Your miter cuts must be 45 degree angles, practice on a piece of the old fascia board before you cut your new lumber.  Miter both ends of the board. Please note: flip the board over to perform the correct 45 degree cut on the opposite end. Miter cuts should butt up against one another.

Instead of nails, I decided to use (3 1/2") screws to attach my fascia board to the rafters. I know, I know, what you are thinking, screws are overkill: but nails pull out during storms and down here we have hurricanes and we are talking about the roof.  Any chance of the wind lifting up the roof will now be reduced.  If I need to remove the fascia (which I shouldn't) I can just unscrew them instead of prying them off as I did during removal. 

If you have a good drill (hammer drill works  better) you do not need to drill a pilot hole. If you do not have a powerful drill you will need to drill pilot holes in the lumber and in the end of the rafters.  Pilot holes should not be the same size as the screw you are using. 

This is a good time to run to the store or send the wife/girlfriend to get food, snacks or beer to bribe your friends over to help you. You will need two people to install the new fascia boards. The length and weight of the boards make them rather cumbersome to lift into place.

Lift the boards into place (2 man lift) and mark the board according to the location of the rafters. Make sure you find the center of the rafter so the nail or screws will have ample area to grab.

Once you have completed replacing the fascia board, re-install the drip edge using new roofing nails.  Because you don't remove the first row of shingles you will need to use your rubber mallet to drive the nails into the roof decking and drip edge.   Take the roofing cement and run a bead of cement under the shingles and on top of the drip edge. If there are any loose shingles secure them back using the roofing cement.

Run a bead of caulk between the fascia board and where it meets the soffits to ensure an energy efficient seal.  If there are any gaps either at the miter joints or the roof line you can use spray foam to seal these gaps to prevent any moisture, insects or animals from entering the house. 

Once you are done  you can paint or stain your new fascia board and re-install your gutters.