
I looked and searched and priced, and was going to spend over $500.00 either way for a shed, so in my creative voice I said I will just build one. I looked on the net for shed ideas and found one that I liked on Pintrest. So I studied the picture over a few days and jotted down some notes. But never really drew up any plans. Yes you read that correctly. This shed was built without a single plan only an image. The total cost of the shed was
But this shed was going to be slightly different after all I live in windy Florida place of hurricanes and sporadic storm fronts. What does living in Florida have to do with building a shed? Well there are some things you have to consider. With winds reaching up to 60mph during a spring or summer storm you don't want to see your shed tumbling through the neighborhood. So it has to be sturdy and secured.
Most sheds you see on Pinterest are your basic garden shed, not really secured, but just relying on the weight to keep it in place. Not so with this.
THIS IS NOT A WEEKEND PROJECT expect to spend some time on this project to get it right.
Tools & Hardware - Let's start with the tools you may need to build your shed
| Circular Saw | Corner Brackets |
| Miter Saw or table saw | Wedge Anchors (tapCon Screws) |
| Drill | 4" Deck Screws |
| Level(s) | 3" Deck screws |
| Hammer | 1 1/2" Deck Screw |
| Tape Measure | 1" Deck Screws |
| Speed Square | Rafter ties |
| Palm Sander | Stud Braces |
| Clamps | Gate Hinges |
| Socket Wrench | Lock/Latch |
| Rubber Mallet | Shingles/felt/plywood |
 As I stated anchoring your shed should be first thought when building your shed. Some places require you to pull permits or submit plans when building a structure on your property so you may want to check with your city before deciding on a location for your shed. But Permits are for suckers, who needs a piece of paper after all it your property right?!
 I am not going to put how many of each item you will need to complete the project because it totally depends on the size of your shed.
I chose to use treated pine for my shed as it was easier to find and cheaper material than cedar ( 1.20 vs 3.94). As long as you get pressure treated lumber your shed will last a long time. The total number of screws used in my shed are 353.
I used the following wood sizes depending on your project:
1x4x10 , 2x4x12 , 1x6x16
Pouring the Foundation
I chose to place my shed off the utility room (just in case I ever wanted to run power to it). Once I had the location now I needed to both raise it to prevent water from entering and to secure the shed. Using left over wood from a pergola I tore down, I framed out my new foundation. Pouring a foundation is relatively simple, all you will need is about 5 - 15 60-80LBS bags of cement depending on the thickness and square foot of the foundation. You will also need a wire mesh (not rebar) that can be found at Lowes or Home Deport for under $10.00. Cement can be pricey so watch for sales at your local hardware store. |
| $8.95 at Lowes. |
 Before the foundation hardens insert the wedge anchors. This will prevent you from having to down drill into the foundation to insert Tapcon Screws. Threaded end pointing skyward. The wedge anchors will be used to secure the walls to the foundation. The anchors should be spaced about 18" - 20" apart to ensure that there are away from any studs when framing the walls.
 Cover the foundation in a plastic sheeting this will help the curing process and also protect your newly poured foundation incase of any inclement weather. The foundation may seem difficult but if you have ever mixed cement you can do the foundation. Please wear gloves when working with cement as it can eat your hands raw. The foundation took me 2 hours to mix and set using a wheel barrow and shovel. Depending on the weather it may take up to 3 days for your foundation to fully cure.
Framing Walls
 While the foundation is curing, you have time to frame out the walls of your shed. There are three main walls: the two sides and the back. If you need to sketch them out before starting now is your chance. Unlike most, I prefer to use screws when working with wood. The main reason is for durability. Screws do not work themselves out unlike nails will over time as the wood expands and contracts. Secondly if you mis-measure or have to undo your connections you can easily unscrew them instead of risking damaging the wood with a hammer or mallet.
 In this picture you can see the side walls are actually framed. The shed will having a sloping room. The roof is sloped toward the back to help with drainage from rain. It is important to take the slope / pitch of your roof into account. Depending on where you decided to locate the shed rain water runoff can harm the area around the shed. It is also important when framing the walls as you want to ensure that the walls sit flush. The studs on the walls are 16" on center. You can do walls 24" on center if you wish, but 16" is the norm meaning that every 16 inches you should run into a stud.
The back wall (not shown) will be shorter in height than the other two walls. Please make sure that the walls are even and flush at the corners.
Siding
 |
| Lap Siding stained and secured using screws |
Lap Siding is easy to achieve. Measure the length of the wall and transcribe that to the planks. The bottom plank should cover the base of the frame fully. Using your table saw/miter/circular saw cut the boards down to size. If your wall is square, you can make continuous cuts until you get to the taper at the top. Make sure the first plank is level across the frame and using the 1 1/2" deck screws screw the board down. Take the next plank and overlap the board just enough to cover the screws in the previous board. Use your level and make sure that it is straight and secure this board to the frame as well. Make sure the plank is secured to each stud on the wall. Hint: Predrill all the holes in the planks before screwing to prevent splintering or cracking.
Repeat these steps for the two side walls and the back supporting wall.
Putting it together
 At this point in the project you will need a partner. After the siding is placed onto the exterior walls they will weigh significantly more. Ask a friend or neighbor, a son, wife daughter but don't try to do it yourself. Unfortunately, I been working out some and the weight wasn't the problem it was supporting the walls while you ratchet them into place. But I managed to do it alone.. How did I accomplish this?, prayer helped, but also two 1x4x10 posts (which is what you will need later) 1 placed on the outside of the wall the other placed on the inside to hold the wall in place. The wedge anchors come with hex nuts and washers for fast easy installations. If you remember from previously your anchors should be placed 18" - 20" apart. transpose the locations of the wedge anchors and drill a hole through the base of the walls (bottom plate) 3/8" hole in this case. You may want to make the hole larger than the bolt so the wall will fit easily into place. Once all the holes are drilled (make sure you double check the placement. Hint: take white out or paint and place a dob of it on top of the anchor lift the wall and set it down on top of the anchors (these will place a mark on the bottom plate) and drill the hole.
  Set the walls in place, have your friend hold the wall while you ratchet the wall into position. Check to make sure everything lines up smoothly and secure the walls. The wedge anchors will support the walls as each one is rated for over 250lbs of force. Join the walls together in the corner. you can use a 3" deck screw to joint the side wall to the back wall. Here again you may want to predrill the hole. Wood is natural and since it is natural there are some knots that you can't see. Predrilling these will save you time and heartache trying to force the screw through this hard section of wood. I placed 6 of these 3" screws on each wall. Once all three walls are together place an L brace on the bottom of each of the studs. This will give it an added layer of reinforcement to prevent sway another step is to brace each section of the wall with a cross brace, more on this later.
 You will notice a mistake I made in prepping the wall. OH SNAP! I forgot a wedge anchor. Oh well not to worry. Get a hammer drill and an TapCon Screw and drill through the baseplate and foundation, insert the TapCon and viola fixed. Remember place the "L" braces along the studs of the wall 1 per side.
Top-plates and Rafters

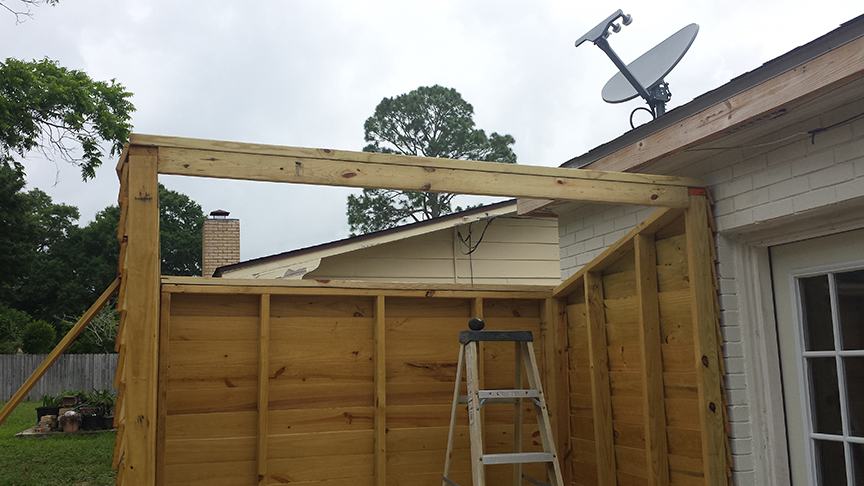
 and is free standing (well with the help of a brace). The next step you can skip if you are just building a simple garden shed. But I don't know what simple is so here is the next step adding top plates. What is a top plate? It is an upper wall plate which is fastened along the top of the wall studs as pictured here. By the time you finish building this shed you will be ranked as an intermediate framer, meaning that the techniques used to frame this shed is the same as framing out rooms and walls in houses and buildings.
 The top plate is going to be used to secure the rafters for the roof as well as secure the three walls together. But first we need to put another board across the front of the shed. This board will be used to frame your doors as well as support the roof and rafter system. This beam will provide lateral support for your shed as well and contain a top plate. Measure the distance from wall to wall and cut the beam (2x6x10) and knock it into place using the rubber mallet. Again its time to call a friend or call in a favor. You will need more than one person for this section of the project. If you have a drill to make pocket holes here is when you need to do so.
If you do not have a pocket hole joiner (Kreg Tool) simply predrill the holes in at a 45 or 35 degree angle into the adjoining boards. Then screw the beams together with the appropriate length screw. Do this for both sides of the beam. Next measure the length for the top plate. The top plate should extend from one side wall to the other and across the door frame. Secure this top plate with screws or nails your choice but screws are better.
 |
| Top plate over door and back wall. |
Because my shed is angled and not square I had to do some additional cuts to place the top plates across the sides of the two walls. What do I mean by additional cuts? Well as you can imagine since the walls are slope
d the space at the end of the walls are slightly off, though the height is not the issue since we will be adding rafters to the shed for the roof. Not necessary if you are going to do a flat roof ( just frame it out as you would a wall). But remember I said I am not simple so I don't take the easy way nor many short cuts.
 So how did I overcome the issue with the height of the side walls vs the height of the back wall? Simply I ripped the 2x4x6 the same angle of the wall using a circular saw and notching out a section to secure the top plate. This would be easier using a table saw but I did not have one handy at the time of this build. Mental note buy a table saw.
The top plates can clearly be seen in these photos. The gap at the top plate is easily solved by adding shims or cutting scrap wood and hammering it into the position of the gap, once in screw down the top plates, you can also caulk this area if you want.
Adding top plates to the shed will add strength and stability to the structure as well as give the rafters an area to be secured down.
Determine the length of your rafters (they should all be the same length). Here is where you will need to use a speed square to determine the pitch of the roof and to make the notches in the rater over the top plates on both ends of the rater. I suggest using scrap wood before making the initial cuts on your wood so you can get the angle just right. The two outer rafters I had to rip in half as they would have been higher than the rest of the roof. When you find the right angles for the notches use each board as pattern for the remaining rafters. You may need to make some slight adjustments for each rafter as wood is not perfectly straight. With the use of your friend ( you may have to bribe them with some beer or food) lift the rafters into position. Like I said I did this portion alone as well, after all I was still working out regularly, lol.
 |
| Back of rafter with 3 rafter ties |
 |
| Front of rafter secured with 2 ties |
 each rafter front and back. Make sure you check the spacing before securing the front of each rafter; you want to at least maintain 16" between each rafter. Add the bracing (rafter ties) to each rafter, 1 on each side of the rafter front and back. Also, for additional support add rafter ties to using the inner bracing as seen in the picture. There should be 5 rafter ties per inner rafter and three for the exterior rafters.
 Repeat the process for each rafter securing both the back and the front of the rafters to the shed. these rafter ties are normally used with nails however, I always use screws even though they are more expensive it just means you don't have to worry about the boards coming undone. The rafter ties are secured with 1 to 1 5/8" screws. You will need to make sure that there is a screw in every hole. If you pulled a permit the inspector will be looking that each hole is used.
 The holes are there for a reason so make sure you use them. Rafter ties will securely hold the roof system in place and will also hold up in winds in excess of 100mph. Here is a
closer look at the rafter ties used. You can pick them up from Lowes for as low as $.59 each, yes fifty-nine cents. Do Not over look these.
 Now that the rafters are basically installed, we need to add cross bracing to the roof system. Cross bracing adds stability and durability as well as allowing the roof decking a place to be anchored too. Measure the space between each rafter and using the scrap wood that you is left from the 2x4x8s cut them to fit in between each rafter. Make sure you stagger them in a step pattern. Secure the cross bracing with 2" deck screws or nails. Once you have finished bracing the rafters do the same thing to the interior walls of the shed. the cross bracing here will prevent the twisting and swaying of the walls and add strength. These cross bracing in the walls can double as storage space or shelves for your tools.
 Now it's time to add the roof decking. Roof decking is nothing more than sheets of 5/8" or 3/4" plywood. Hoist the roof decking in place and secure using either screws or nails; you already know which I chose, yup 1 1/2" screws. Place hurricane clips between the decking sheets. the hurricane clips provide strength to the decking where there is a two pieces being joined. Tack down the roof felt (about 24.00 a roll at your local hardware store), you will have a lot of felt left over, using roofing tacks.
Building the Doors
 The doors of the shed can be done last as well as the added trim. To build the doors you will need to frame them using 1x4x10s and fence planks or plywood. The fence planks look more decorative. Once you have measured the inside frame for the doors transfer those measurements to your lumber. Frame the door as you would the walls, first the outer walls beams first, followed by the cross bracing then secure the planks to the door frame. Remember to leave room from the edges of the door for the hinges and the closing of the door. You will need to add a door stop to the door frame and you want to make sure that the edge of the door fits properly. You will need to use your large clamps here as well as a bottle of wood glue and the same friend you called upon before. These are large doors and are considerably heavy between 50 - 80lbs each. Depending on the size of your door you may need three gate hinges to attach the door. Have your friend hoist the door in place while you attach the gate hinges start at the top, proceed to the bottom hinge and then the center hinge this will make sure the door is even. Open the door and close it to make sure it is landing where you desire especially at the door stop. Repeat this process for the second door if there is one. I chose not to stain the doors as the natural wood grain on these planks look great.
 You are almost done, just a few more touches and your shed will be ready to store your items. Choose your shingles, mostly likely use the same type as is on the roof of your home. I chose
 architectural shingles, cost a little more but I only needed two bundles (29.00 each). I left the overlap of the shingles at the front. The reason for this is that I wanted the shed to be able to breath. Sure the lap siding provides some airflow but the I purposely left the portion between the roof and the top plate open so air could pass through freely alleviating the danger of fumes from gas or any other chemicals that may be stored in the shed. I did, however, put a screen (not shown) in these gaps to keeps wasps and insects out of the shed. I also took an added measure of preventing spiders and other unwanted insects by spraying pesticide around the top and bottom of the shed. This is to be repeated every 6 - 9 months.
Enjoy your new shed.
